

Commissioning#
Discovery#
This chapter describes ways of connecting to a device that uses the default settings. If the device is already configured, you can access the web interface simply by entering the IP address directly into the address bar of a web browser.
Default Device Behavior#
If a DHCPv4 or DHCPv6 server is present in the network, the device will receive the correct network configuration upon startup. In case of an error or when no DHCP server is available, link-local IP addresses can be used. Because such addresses are never routed, the device will be unable to communicate with anything outside its local network segment, and a valid configuration will need to be applied manually. A client with a link-local address (e.g., 169.254.x.x or fe80::/10) might be needed to access the web interface until the device is properly configured.

Note
The first startup takes longer than subsequent ones. It can take up to a minute until the device becomes reachable over the network.
Determining the Device IP#
There are multiple ways of discovering the device in the network.
Note
If you are connecting to the device on a network without a DHCP server, your host computer must temporarily also use a link-local network address. Usually this works without modifying any settings, but under some circumstances, some temporary changes are needed. See Network FAQ for more details.
Using SSDP#
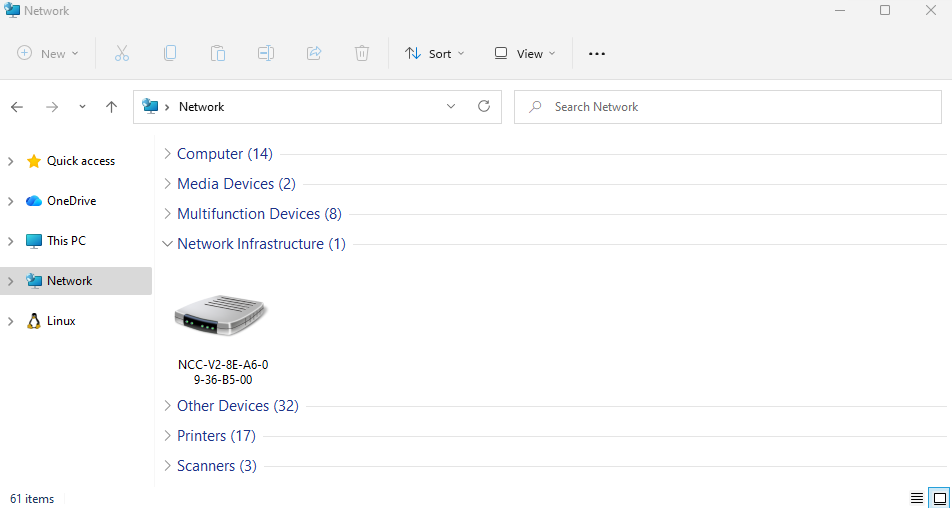
On Windows, open the file explorer and navigate to the Network section. The web interface is opened by double-clicking on the device:
Note
On Linux, the ssdp-scan utility offers a similar way to discover devices.
Using SNMP#
SNMPv2c is enabled by default. This allows the device to be discovered using an SNMP GET request broadcast. Most SNMP management tools support this discovery method. The screenshot below illustrates the process for the SNMPB software:
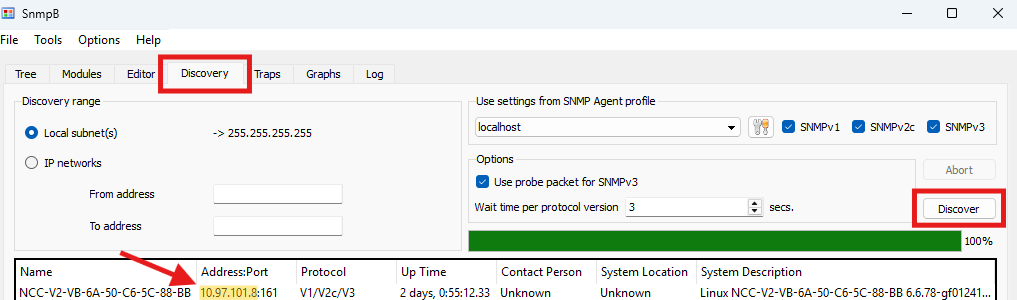
Once the device is detected, copy its IP address (without the port) into the address bar of a web browser and press Enter to open the web interface.
DHCP Server#
If the network provides a DHCP server, there are two additional ways to discover the device. Details may vary depending on the DHCP server vendor. Refer to the server documentation for specifics.
Check the assignments: The DHCP server maintains a list of currently assigned IP addresses, typically showing hostnames and IPs. The device’s IP address can be identified from this list.
IP Assignment by MAC Address: Most DHCP servers allow assigning a specific IP address to a device based on its MAC address. Using this method, a predefined IP can be assigned to the device.
Once the IP address is known, it can be accessed via a web browser.
IPv6 EUI-64#
For IPv6, the device generates a link-local address using the EUI-64 method, which derives it from the device’s MAC address. This process is deterministic: if the MAC address is known, the link-local IPv6 address can be calculated. The MAC address is printed on a label on the device.
The example below illustrates the calculation manually, though it is usually easier to use an online EUI-64 calculator.
Device MAC address as printed on the label:
4E:D1:BA:A7:0F:40Split the address in half:
4ED1BA + A70F40Insert
FFFEin between:4ED1BA + FFFE + A70F40Arrange into groups of four hexadecimal digits:
4ED1:BAFF:FEA7:0F40Invert the 7th bit (second hex digit):
4CD1:BAFF:FEA7:0F40Add the link-local prefix
FE80::to get the final address:FE80::4CD1:BAFF:FEA7:0F40
IP Scanner#
The device IP address can also be discovered using an IP scanner. This method may take longer than the alternatives described above and is therefore not preferred.
If used, the scan should be limited to the IPv4 address range assigned by the DHCP server (if known, for example 192.168.0.0/8) or to the IPv4 link-local range (169.254.0.0/16). Scanning IPv6 address ranges should be avoided due to the very large number of possible addresses.
Webinterface#
The web interface is the primary method for accessing and configuring the device.
Connecting#
To connect, enter the device’s IP address into the address bar of a web browser. Do not include a port number. When using an IPv6 address, ensure that it is enclosed in square brackets.
Example (IPv4):
10.97.101.15Example (IPv6):
[FE80::4CD1:BAFF:FEA7:0F40]
Initial Security Warning#
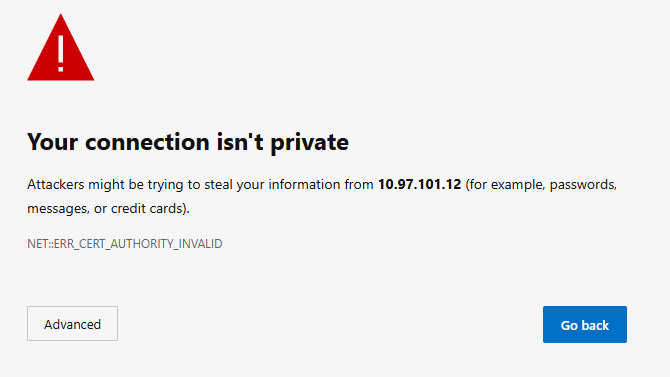
Upon first opening the web interface the following error message is shown, which means that the browser does not trust the device’s TLS certificate. This can be fixed by later configuring a trusted certificate as described in TLS Certificates. With a direct network connection to the device, it is usually reasonable to click on Advanced and proceed with commissioning despite this warning.
Login#
A login window is then shown. Each device comes pre-configured with a unique password. This password is printed on a label on the device (example: 6PBQ-EGXE-A9RV-SWYE-3KVJ):
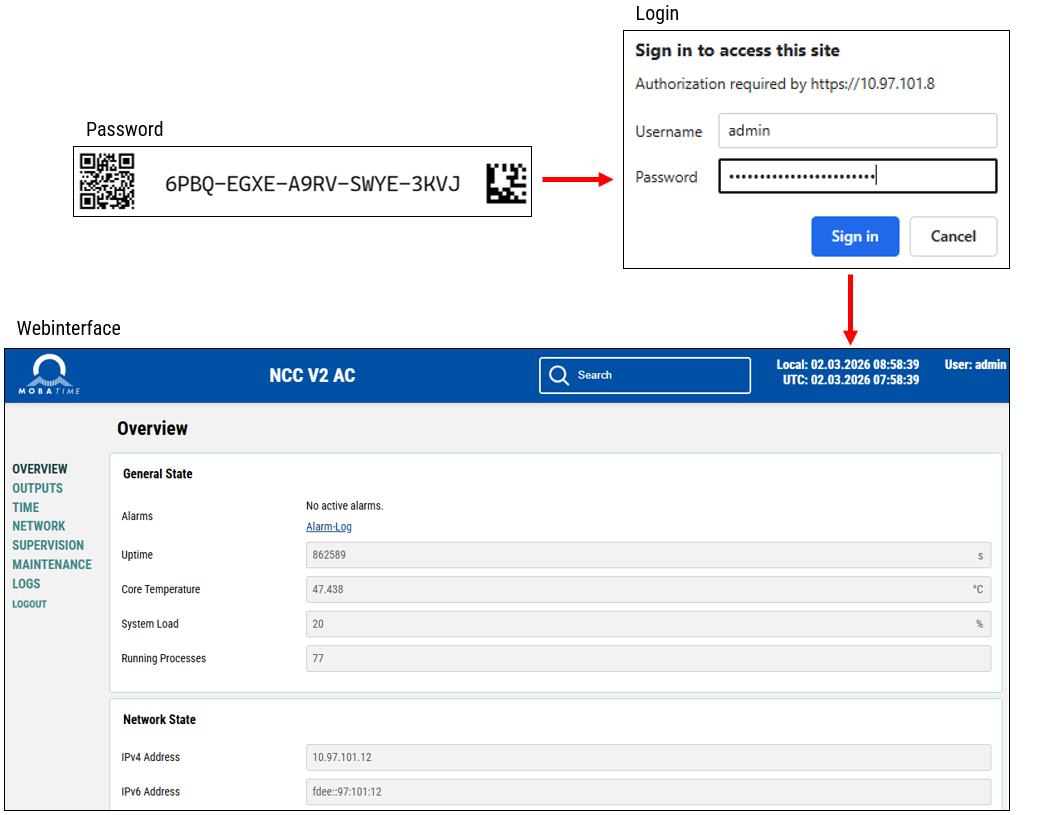
Once logged in, the web interface is shown and it is now possible to configure the device.
Warning
After the first successful login, the default password must be changed immediately.
Warning
Use a secure password manager to store the administrator password. This enables the use of randomly generated, long, unique, and highly secure passwords.
Warning
If access to the administrator password is lost, a factory reset must be performed. If the factory reset function has been disabled, recovery is not possible.
Modifying Settings#
One of the first configuration tasks is typically to adjust the network settings so that the device integrates into the existing network.
The general workflow for modifying the device configuration is shown below:
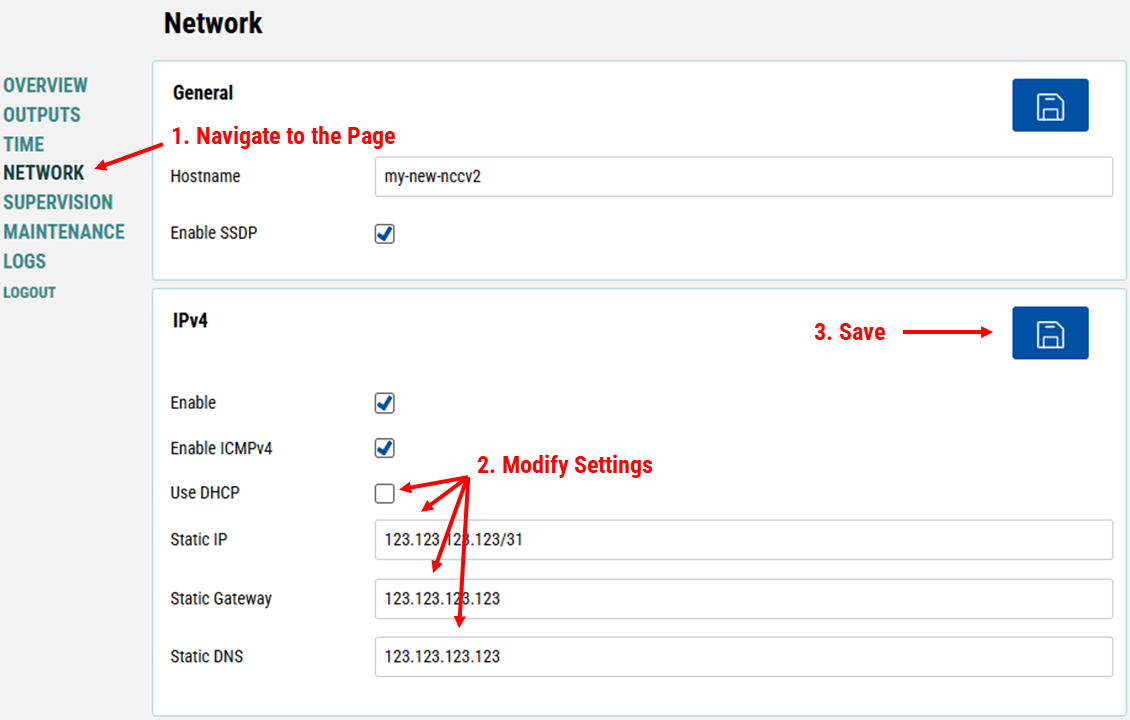
Navigate to the relevant settings page. There is also a search bar that will show all options related to a term.
Modify the desired values. Input fields that are not applicable are automatically hidden (for example, the static IP address fields when DHCP is enabled). Hovering over a setting displays additional help text.
Save the configuration.
Refer to the next chapter for a detailed description of all available configuration parameters and actions.
Note
Changing network settings may temporarily interrupt the connection. If the device’s IP address changes, reconnect using the new IP address.